Fixtures and patching
Adding fixtures, addressing them, and placing them in the room.
Fixtures are the foundation of every show file in LMX. A fixture record links a fixture ID to a profile/type, patch address and live attributes.
What a fixture contains
Each fixture stores:
- Fixture ID (operator-facing identifier)
- Name/label
- Fixture type/profile
- Universe and start channel
- Attribute capabilities (for example dimmer, pan, tilt, colour, shutter)
In practice, this means every command that changes output eventually resolves to one or more fixture capability values.
In the GUI
Fixtures live on the Fixtures & Groups tab. The Fixtures table lists
every patched fixture with its ID, name, type and DMX address (Univ/Ch).
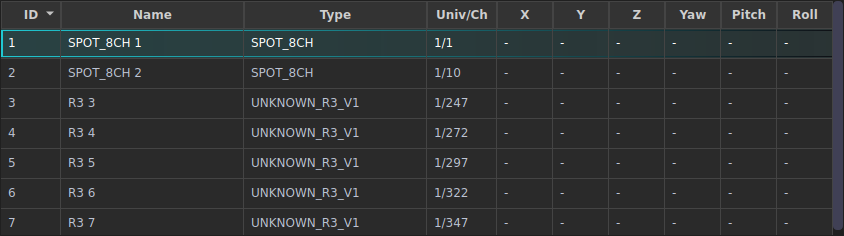
Patch fixtures
Click Patch wizard to add fixtures: pick a model from the library, set a quantity, and drop them onto the DMX grid.
Equivalent command:
ADD FIXTURE <id> TYPE <type> AT <univ>/<ch>.
| In the GUI | What it does | Equivalent command |
|---|---|---|
| Click a fixture row (Ctrl-click to add) | Select fixtures to program | FIXTURE <id> / SELECT |
| Double-click the Name cell | Rename the fixture | UPDATE FIXTURE <id> NAME "…" |
| File → Fixture Editor | Create or adjust fixture profiles | FIXTURE EDITOR |
| Trash button | Remove the selected fixture | DELETE FIXTURE <id> |
Operator notes: if output isn’t changing as expected, first confirm you
selected the intended fixtures. Keep names practical (e.g. DS Wash 1,
Spots Truss A) for fast cue updates.
CLI commands
Listing and inspection
LIST FIXTURES
Shows fixture IDs, names, types and patch details. PATCH REPORT prints the
full address table with overlap warnings.
Patching
ADD FIXTURE 1 TYPE <model|manufacturer model> [MODE <mode>] AT <univ>/<addr>
CLONE 1 4 AT NEXT                      # duplicate fixture 1 as 4, next free address
UPDATE FIXTURE 1 AT 2/1                # re-address
EXCHANGE 1 TYPE <model> [FORCE]        # swap profile, keep programming
DELETE FIXTURE 1 [FORCE]
Every one of these takes an id list, so a whole rig is one command:
CLONE 1 THRU 8 20 AT NEXT              # clones to new ids 20-27
UPDATE FIXTURE 1 THRU 8 AT 2/1         # packs the eight back-to-back from 2/1
RENUMBER FIXTURE 1 THRU 8 TO 101       # renumbers to 101-108
EXCHANGE 1 THRU 24 TYPE <model> FORCE  # swap a whole rig's profile
DELETE FIXTURE 1 THRU 8 + 12 [FORCE]
CLONE, UPDATE … AT and RENUMBER spread the range across consecutive
destinations and validate the entire plan first - if the batch cannot fit, or a
destination id is taken, nothing changes at all. EXCHANGE and DELETE apply
per fixture: one that is blocked is reported and skipped, and the rest proceed.
See Recipes for a complete patching walkthrough.
Selection
FIXTURE 1
FIXTURE 1 THRU 8
FIXTURE 1 + 3 + 7
Use FIXTURE to drive programmer edits or store operations against a known selection.
Setting attributes
With fixtures selected, type a capability name and a value:
INTENSITY 65
RED 100 ; GREEN 60 ; BLUE 20
PAN 45
Any capability the selected fixtures expose can be set this way (use
SHOW FIXTURE <id> to see a fixture’s capabilities).
Clearing selection
CLEAR SELECTION
Removes active fixture selection without clearing programmer data.
(CLEAR PROGRAMMER clears programmer values; CLEAR ALL does both.)
Example workflow
LIST FIXTURES
FIXTURE 1 THRU 6
INTENSITY 65
RED 100 ; GREEN 60 ; BLUE 20
STORE CUE 1 "Warm wash"
Result: fixtures 1–6 are selected, set to 65% intensity and a warm colour, then stored.
Troubleshooting
- Fixture does not respond: check patch universe/channel and fixture profile capabilities.
- Wrong attribute changes: likely profile mismatch; validate capability mapping in Fixture Editor.
- Unexpected output after selection: confirm programmer values are clear when starting (
CLEAR PROGRAMMER).