The programmer
Where you build a look: attribute controls, banks, live and blind.
The programmer is the scratch layer you build looks in. It sits on top of everything else - cues, faders, effects - so whatever you touch here is what the stage does, until you clear it or store it.
That is also the single most common cause of “my cue looks wrong”: something is
still held in the programmer. CLEAR PROGRAMMER first, ask questions after.
In the GUI
The right-hand side of the Fixtures & Programmer view. It shows a control for every attribute the current selection actually has - select a dimmer and you get one fader; select a hybrid and you get pan, tilt, colour mixing, wheels, gobo rotation, prism, frost, zoom, focus, iris and shutter.
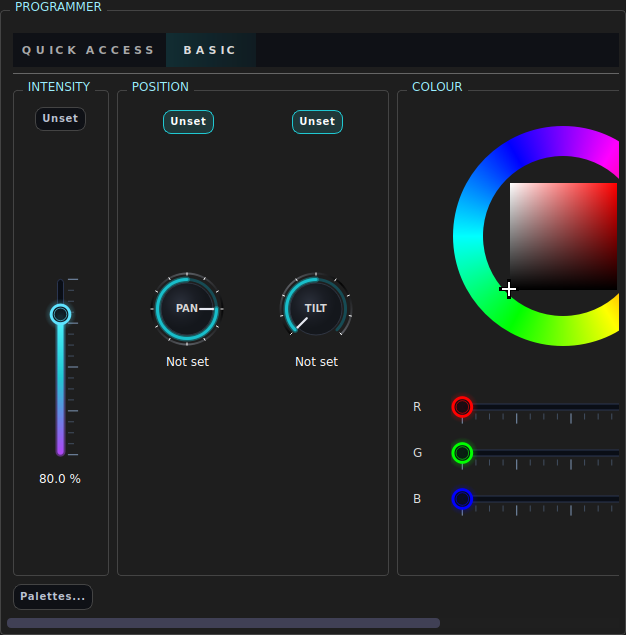
Controls are spread over bank pages, switched with the tabs at the top:
| Bank | Holds |
|---|---|
| Quick Access | Tiles for the palettes/presets/effects/targets valid for this selection - see Quick Access |
| Basic | Intensity, colour mixing and the colour picker, position, colour wheel, colour temperature |
| Gobos | Gobo wheels, with gobo rotation embedded beside the wheel it belongs to |
| Beam | Zoom, focus, iris, shutter/strobe, prism, frost |
| Custom | Colour macros, and anything else the fixture profile exposes |

Colour macros live in Custom, not Basic. A macro is the manufacturer’s own list of canned looks - “Color Macro 1” to “Color Macro 64” on an LED bar - and it is not how you set a colour on the desk, so it sits with the fixture’s other vendor channels and leaves the Basic tab to the picker, the colour wheel and the colour temperature. The same goes for a second, coarser way to set colour temperature: where a fixture offers both a CTO slider and a wheel of Kelvin-labelled steps (the ADJ ElectraPix Bar does), the slider stays in Basic and the step list moves to Custom. A fixture whose macro or Kelvin list is the only colour control it has keeps it in Basic, where you would look for it.
A selection of mixed fixture types shows the attributes they have in common; where a wheel slot exists on some fixtures but not others, an amber note under the control says so (“Only showing gobos which match all selected fixtures”).
What the controls do
| Control | Behaviour |
|---|---|
| Slider | Drag, or click the number and type a value then press Enter |
| Dial (pan/tilt) | Drag round; the number below reads in degrees |
| Colour picker | Click a colour; LMX converts it into whatever emitters the fixture actually has (RGB, RGBW, CMY, …) |
| Wheel strip | Click a slot; only slots common to the whole selection are offered |
| Unset button | Drops that one attribute out of the programmer |
| Warning marker | A related value exists somewhere you cannot see it - on a head, on a group, or on a fixture inside a selected group |
Every one of these echoes its command into the history, so the same edit typed by hand is always available.
From the command line
Attribute commands are attribute-led, not verb-led - the capability name is the command:
INTENSITY 100
RED 100 GREEN 40 BLUE 0
PAN -25 TILT 12
ZOOM 30 FOCUS 55
GOBO 3
SHUTTER.STROBE 4          # a segmented capability, addressed by segment
Several attributes can go on one line, and an explicit target can lead:
FIXTURE 1 THRU 4 INTENSITY 80 RED 100
GROUP 2 TILT -10
Levels the short way
Intensity is the one attribute you set constantly, so it has the shorthand every
console shares. @ (or AT) means intensity, and FULL and OUT mean 100 and
0:
1 THRU 8 @ FULL         # same as 1 THRU 8 INTENSITY 100
1 THRU 4 @ 50
1@75                    # the spaces are optional
GROUP 2 AT 60
5 THRU 8 OUT
INTENSITY is still the canonical form and what the GUI echoes; this is a
shorthand for it, not a second way of storing anything.
Values are kept in range
A capability publishes its own range - 0–100 for a dimmer, −270 to 270 for a pan, a Kelvin span for a colour temperature - and a value outside it is brought back to the nearest end, with a note saying so:
INTENSITY 250
Warning: 250 is outside the range 0..100 of 4 selected fixtures for 'intensity' - clamped to 100
The range is named whenever every fixture that was clamped shares one, which is
what tells you why the value was refused rather than only where it landed.
It matters most where a range is signed: a Rogue R3 Spot’s gobo rotation signs
clockwise negative, so GOBO_ROTATE.ROTATE_CW 100 is out of range and comes
back to −0.1 - the slowest clockwise speed, not the fastest.
GOBO_ROTATE.ROTATE_CW 100
Warning: 100 is outside the range -655..-0.1 of 1 selected fixture for 'gobo_rotate.rotate_cw' - clamped to -0.1
Typing GOBO_ROTATE.ROTATE_CW -100 is what asks for 100°/s clockwise. Where
the selection’s fixtures disagree about the range there is no single one to
quote, and the note says so instead.
A wheel is not clamped, because a gobo or colour wheel is addressed by its
raw slot value rather than by the range the wheel publishes - GOBO 21 picks
gobo 21 whatever the wheel’s own span happens to be.
The attribute names are the fixture profile’s own capability names - whatever
the control in the programmer is labelled, that is what you type. SHOW FIXTURE <id> lists them for a given fixture.
To take a value back out:
FIXTURE 1 UNSET           # every attribute on those fixtures
CLEAR PROGRAMMER          # the whole programmer
Seeing what you are holding
SHOW PROGRAMMER           # everything in the programmer, by fixture
SHOW SELECTION            # what is selected
INSPECT FIXTURE 4         # where each of fixture 4's values comes from
INSPECT FIXTURE 4 CAP pan # …for one capability
INSPECT (alias WHY) is the one to reach for when a value is not what you
expect: it prints the whole stack for that fixture - cue layer, fader, effect,
programmer - and which one won.
Live and Blind
| State | Meaning | Command |
|---|---|---|
| Live | Programmer output reaches the merge and the rig | LIVE |
| Blind | Programmer output is suppressed, including programmer effects | BLIND |
Blind lets you build the next look while the current one keeps playing. The main window’s background turns dark blue so you cannot forget you are in it.
The local 3D visualiser can be told to show the blind programmer anyway, which is how you preview a blind look without putting it on stage:
CONFIG BLIND VISUALISER OFF|FULL|PROGRAMMER
Art-Net and sACN always send the real output, whatever the visualiser is showing.
Highlight, Lowlight and Solo
Three output overrides, on the fixture action row, that exist to show you what you have selected:
| Button | Effect | Command |
|---|---|---|
| Highlight | Selected fixtures go to a bright, open, white state | HIGHLIGHT ON|OFF |
| Lowlight | Unselected fixtures drop to a dim level | LOWLIGHT ON|OFF |
| Solo | Only the selected fixtures output at all | SOLO ON|OFF |
What “highlight” and “lowlight” mean is configurable - level, colour, gobo, and which fixtures are exempt:
CONFIG HIGHLIGHT INTENSITY 100
CONFIG HIGHLIGHT RED 100 GREEN 100 BLUE 100
CONFIG HIGHLIGHT GOBO OPEN
CONFIG LOWLIGHT INTENSITY 15
CONFIG LOWLIGHT EXCLUDE 41 THRU 48
HTP or LTP
CONFIG PROGRAMMER HTP|FORCELTP decides how a programmer intensity meets the
intensity already coming from playback:
- HTP (highest takes precedence) - the brighter of the two wins, so pulling a programmer fader down does not darken a cue that is holding the same lamp up.
- FORCELTP - the programmer’s value simply wins, up or down.
Non-intensity attributes are always LTP: the latest instruction wins.
What the programmer feeds
Everything downstream reads the programmer:
- Store a cue -
STORE CUE <n>, or the Programmer → button - Store a preset -
STORE PRESET <n>, or Presets… → Store - Store a palette -
STORE PALETTE <id> TYPE …, or Palettes… → Store - Store a group -
STORE GROUP <n> "name"
STORE CUE <n> OUTPUT stores the whole live output instead - cues plus faders
plus programmer, as the audience sees it. See Cues.
See also
Selecting fixtures · Fanning and spread · Quick Access · Palettes · Presets · Output and master controls