Targets and aiming
Points in the room that fixtures can be aimed at or bound to.
A target is a named XYZ point in stage space. Once a fixture is calibrated, you can tell it to point at a target by name rather than typing raw pan/tilt angles - and if the target’s position is updated later, any cue that references it re-solves automatically.
Coordinate system
LMX uses a right-handed coordinate system with the following conventions:
| Axis | Direction |
|---|---|
+X | Stage left |
+Y | Upstage (away from audience) |
+Z | Up |
Positions are in metres. All POS x y z values follow this convention.
In the GUI
Targets live on the Targets tab. The table lists your targets with their XYZ position and calibration slot; the buttons below manage them.
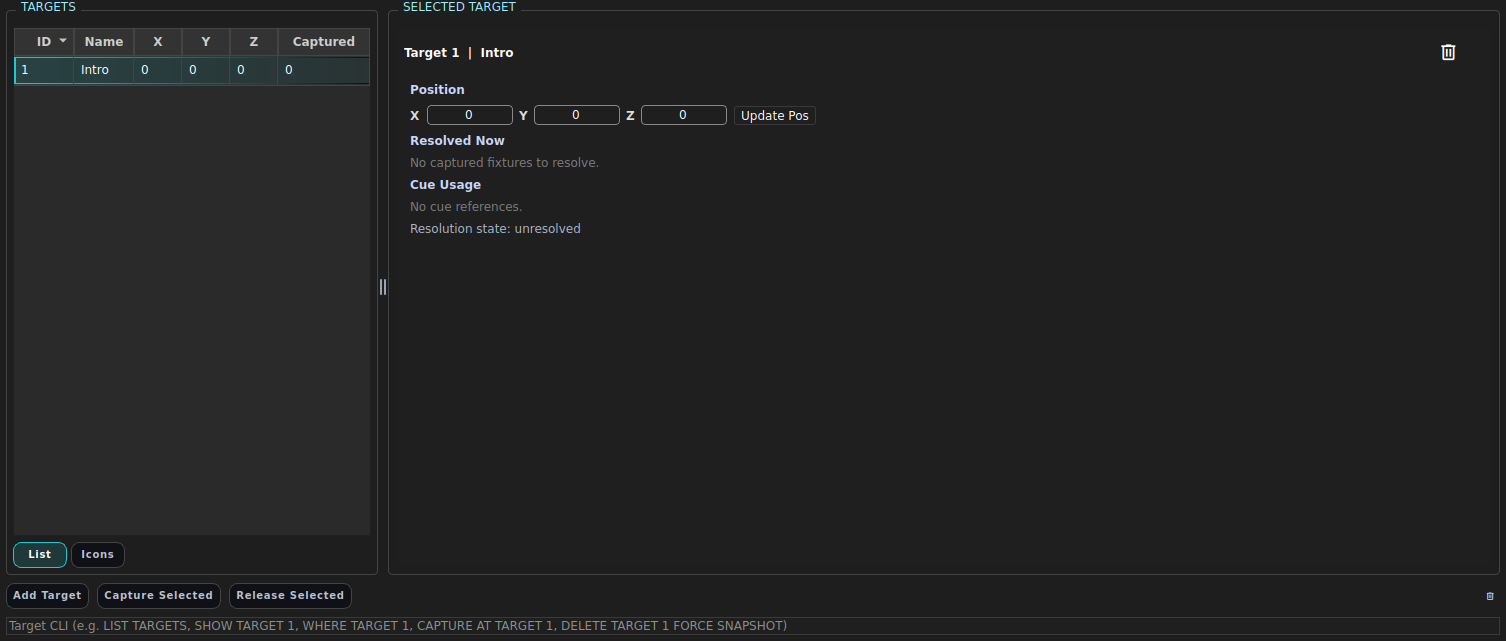
Create a target
Click Add Target. A new target row appears, which you then position by editing its X / Y / Z cells (in metres) - or by capturing the current aim with Capture.

Equivalent command:
CREATE TARGET [<id>] NAME "…" POS x y z [CALIBRATE <slot>].
Edit a target’s name or position directly in its table cells: double-click a
Name / X / Y / Z cell to edit it, exactly as in the fixtures table. Enter
commits, Escape puts the old value back, and the desk re-solves any cue that
references the target. Delete a target with the trash button
(DELETE TARGET <id|name> [FORCE SNAPSHOT|MATERIALIZE]).
Double-click a target’s ID cell - or its icon in the Icons view - to open the
live target window for it (SHOW TARGET WINDOW <id>), where you can drag the
target around the stage with the fixtures following it. (The Name / X / Y / Z
cells are where double-click means “edit this value”, so the gesture lives on
the rest of the row.)
List and Icons
The List / Icons buttons under the target list switch between the table and a grid of generated icons. Each icon is a bird’s-eye plan of your stage: a grey box for the stage itself, grey outlines for any scene objects you have defined (trusses and fixtures are left out so they cannot bury the target), and a blue dot for the target, with its exact XYZ underneath.
Icons show the target’s saved position. Dragging a target around the target window moves the live one - output and the 3D view follow the mouse - but the icon only moves when you press Save, so it never advertises a position that closing the window would throw away.
The choice of view is remembered between sessions and is not part of the show.
Full workflow: calibrate → aim → cue
The complete XYZ workflow has three phases:
Phase 1 - Create targets
Define one target for each physical point on the stage you want to use. You need four calibration targets (slots 1–4) that span the rig’s working area. Four points on the floor work fine; spreading them in height as well (say, one on a riser) gives the solver better accuracy. These tell the solver where the fixture physically is in 3D space.
CREATE TARGET 1 NAME "Cal FL"  POS  9.0  2.0 0.0 CALIBRATE 1
CREATE TARGET 2 NAME "Cal FR"  POS  3.0  2.0 0.0 CALIBRATE 2
CREATE TARGET 3 NAME "Cal BL"  POS  9.0  7.0 0.0 CALIBRATE 3
CREATE TARGET 4 NAME "Cal BR"  POS  3.0  7.0 0.0 CALIBRATE 4
Additional non-calibration targets are your working focus points:
CREATE TARGET 10 NAME "Vocal spot"    POS  6.0 3.0 0.0
CREATE TARGET 11 NAME "Drum kit"      POS  7.5 5.0 0.0
CREATE TARGET 12 NAME "Centre stage"  POS  6.0 4.0 0.0
Phase 2 - Calibrate fixtures
Mark your fixture’s own position in the patch so the solver knows where it
hangs. Edit the fixture (via the GUI fixture editor or UPDATE FIXTURE) and
set its POS x y z and ORI yaw pitch roll to the rig position.
ADD FIXTURE 1 TYPE Chauvet Professional Rogue R3 Spot AT 1/1 POS 4.0 0.0 6.0 ORI 0 -30 0
Then run CALIBRATE to open the calibration window. In the window, point the
fixture manually at each calibration target in turn and press Capture for
each slot. When all four slots are captured, press Solve - the solver
derives the fixture’s precise hanging position and orientation from the four
known ground-truth positions.
CALIBRATE
CALIBRATErequires the four calibration target slots to be defined (see Phase 1) and the GUI to be running.
Phase 3 - Aim fixtures at targets
Option A: One-shot solve into the programmer (AIM)
AIM FIXTURE … AT TARGET … solves the pan/tilt angles immediately and writes
them into the programmer as concrete values. Use this for a quick manual focus.
AIM FIXTURE 1 AT TARGET "Vocal spot"
AIM FIXTURE SELECTED AT TARGET 12
The programmer then shows explicit pan/tilt values, not a live reference.
Option B: Live target reference in the programmer
CAPTURE AT TARGET <id|name> attaches a live reference to the target in the
programmer for the current selection. Name the fixtures explicitly with
CAPTURE FIXTURE <ids...> AT TARGET <id|name>. The pan/tilt values resolve each
frame, so:
- If the target position is updated later, all cues that use it update automatically.
- After re-calibrating a fixture, captured cues re-solve without re-storing.
CAPTURE AT TARGET "Vocal spot"                  # attach reference to the selection
CAPTURE FIXTURE 1 THRU 8 + 12 AT TARGET "Vocal spot"   # or name fixtures explicitly
CAPTURE GROUP 5 AT TARGET "Vocal spot"          # or a group, resolved to its members
STORE CUE 10 "Vocal look"
CAPTURE reads as the live-binding counterpart of AIM, which aims once and
lets go:
AIM     FIXTURE 5 6 7 AT TARGET 1   # solve pan/tilt once, then release
CAPTURE FIXTURE 5 6 7 AT TARGET 1   # keep them bound to the target
To remove a live reference and go back to raw angles:
RELEASE FROM TARGET "Vocal spot"                # release the current selection
RELEASE FIXTURE 5 6 7 FROM TARGET "Vocal spot"  # or name fixtures explicitly
RELEASE GROUP 5 FROM TARGET "Vocal spot"        # or a group
Editing a cue’s target bindings directly
CAPTURE and RELEASE work on the programmer, so changing a stored cue means
loading it back, editing, and re-storing. The CUE forms edit the cue in
place instead - same selection clause, no programmer involved:
CUE 10 CAPTURE FIXTURE 5 AT TARGET 1        # cue 10 now aims fixture 5 at target 1
CUE 10 CAPTURE GROUP 5 AT "Vocal spot"      # group resolves to its members
CUE 10 CAPTURE AT TARGET 1                  # binds the current selection
CUE 10 RELEASE FIXTURE 5 FROM TARGET 1      # unbind one fixture
CUE 10 RELEASE FROM TARGET 1                # drop the whole binding (ALL is a synonym)
CUE 10 RELEASE SELECTED FROM TARGET 1       # ... or just the current selection
CUE 10 PART 2 CAPTURE FIXTURE 5 AT TARGET 1 # a specific part
A binding left with no fixtures is dropped, so the cue stops referencing the
target at all. CAPTURE lands on part 1 unless PART names another - the same
routing STORE/UPDATE CUE use for target references - while RELEASE
covers every part of the cue unless PART narrows it. A fixture already
captured by a different target in that part is left alone with a warning,
exactly as in the programmer.
The one place the cue form reads differently from the programmer’s RELEASE:
naming no fixtures releases the cue’s whole binding, not the current
selection. A stored cue holds its own fixture list, so the desk’s live
selection has no bearing on it - SELECTED asks for the selection explicitly
when you do want it.
Full CLI command reference
CREATE  TARGET [<id>] [NAME <name>] POS <x> <y> <z> [CALIBRATE <1-4>]
UPDATE  TARGET <id|name> POS <x> <y> <z>
UPDATE  TARGET <id|name> NAME <name>
UPDATE  TARGET <id|name> CALIBRATE <1-4>|REMOVE
CAPTURE [FIXTURE <ids>] [GROUP <ids>] [HEAD <f.h>] AT   [TARGET] <id|name>
CAPTURE AT   TARGET <id|name>                     (captures the current selection)
RELEASE [FIXTURE <ids>] [GROUP <ids>] [HEAD <f.h>] FROM [TARGET] <id|name>
RELEASE FROM TARGET <id|name>                     (releases the current selection)

CUE <n> [PART <p>] CAPTURE [<selection>] AT   [TARGET] <id|name>
CUE <n> [PART <p>] RELEASE [<selection>] FROM [TARGET] <id|name>
CUE <n> [PART <p>] RELEASE FROM TARGET <id|name>  (releases the cue's whole binding)
LIST    TARGETS
DELETE  TARGET <id|name> [FORCE SNAPSHOT|MATERIALIZE]
SHOW    TARGET <id|name>
WHERE   TARGET <id|name>

AIM     FIXTURE <ids...|SELECTED> AT TARGET <id|name>
AIM     GROUP <ids...> AT TARGET <id|name>
AIM     AT TARGET <id|name>                    (aims the current selection)

CALIBRATE    (opens the calibration GUI - requires four calibration slots)
Every target command follows the desk’s usual VERB NOUN shape, so it reads
the same way as DELETE FIXTURE, LIST GROUPS or AIM FIXTURE … AT TARGET ….
CAPTURE, RELEASE and AIM all take the same selection clause as
SELECT: FIXTURE, GROUP and HEAD are sticky keywords that may appear
in any order and repeat, ids accept + / THRU expressions, and target names
are matched case-insensitively.
The FIXTURE and TARGET keywords are both optional, so these are all the
same command:
CAPTURE FIXTURE 1 THRU 4 AT TARGET 3
CAPTURE 1 THRU 4 AT TARGET 3
CAPTURE 1 THRU 4 AT 3
A GROUP clause resolves to the group’s member fixtures, and a HEAD ref
resolves to its parent fixture. A target owns fixtures, not a group reference -
so unlike a cue or a preset, capturing a group is always absolute, and later
edits to the group’s membership do not change what the target holds:
CAPTURE GROUP 5 AT TARGET 1
CAPTURE 1 THRU 4 GROUP 5 AT TARGET 1   # mix both; order does not matter
AIM     1 THRU 4 AT 3                  # AIM takes the identical clause
The same applies when you capture the current selection: a selected group is
resolved to its members regardless of CONFIG GROUP REFERENCE|ABSOLUTE.
Aliases. TARGET CREATE, STORE TARGET and RECORD TARGET are accepted
for CREATE TARGET; TARGET UPDATE, TARGET LIST and TARGET DELETE are
accepted for their canonical spellings. TARGET CAPTURE and TARGET RELEASE
were removed - use CAPTURE … AT TARGET and RELEASE … FROM TARGET.
DELETE TARGET refuses to delete a target that is referenced by a cue. To
delete anyway, choose what happens to those cue references:
FORCE SNAPSHOT- each cue keeps an XYZ reference, frozen to the target’s final position (no longer linked to the deleted target). Fixtures still re-solve to that point after re-calibration.FORCE MATERIALIZE- each cue reference is replaced by the explicit pan/tilt values solved at delete time.
DELETE TARGET also takes an id list, so a block of targets goes in one
command - DELETE TARGET 1 THRU 8. A target named rather than numbered is
always a single target (DELETE TARGET "Vocal spot"). Any target in the range
that a cue still references is skipped with its reason and the rest are
deleted; re-run with FORCE SNAPSHOT/FORCE MATERIALIZE to take those too.
Worked example - vocalist spot in a cue
# 1. Define the stage point
CREATE TARGET 20 NAME "Vocalist" POS 6.0 3.5 0.0

# 2. Capture reference for fixture 5 into the programmer
CAPTURE FIXTURE 5 AT TARGET 20

# 3. Confirm the resolved angles
SHOW TARGET 20

# 4. Store the cue
INTENSITY 100
STORE CUE 5 "Vocal spot"
CLEAR PROGRAMMER

# 5. Move the vocalist's mic stand forward, update the target
TARGET UPDATE "Vocalist" POS 6.0 3.0 0.0
# Cue 5 now re-solves to the new position automatically - no re-store needed.
Behaviour when a target is unreachable
If the solved pan/tilt falls outside the fixture’s physical range, the output
depends on CONFIG TARGET UNREACHABLE:
| Mode | Behaviour |
|---|---|
ON (default) | Drives the fixture as close as it can get (angles clamped to the physical range); intensity is untouched |
OFF | Drives as close as it can get, but forces the fixture’s intensity to 0 while the target is unreachable - the fixture blacks out rather than pointing at the wrong place |
FADE | Dims the fixture progressively as the solved angles approach a physical limit: intensity scales from full down to 0 across the safezone band |
CONFIG TARGET UNREACHABLE ON
CONFIG TARGET UNREACHABLE OFF
CONFIG TARGET UNREACHABLE FADE
CONFIG TARGET SAFEZONE 5     # width in degrees of the FADE dimming band (default 10)
INSPECT FIXTURE <id> reports the reachability state either way.
Moving between two targets
When one cue captures a fixture at a target and the next cue that captures it uses a different position, the beam travels the straight line between them at constant speed, rather than fading pan and tilt separately (which bows the path and varies its speed). LMX works out in advance whether the fixture can perform each such move and quietly falls back to the ordinary pan/tilt fade when it cannot - for instance when the path would run past a pan limit, or when a line passing close under the fixture would need a faster pan sweep than a head can track.
CONFIG LINEARMOVE ON            # default
CONFIG LINEARMOVE OFF
CONFIG LINEARMOVE MAXPANRATE 300   # degrees per second, default 300
SHOW CUE <n> reports, per captured fixture, whether the move to the next
capturing cue is linear and why not if it isn’t. Full detail - including the
neighbour rules and the fire-time checks - is in
Configuration (CONFIG LINEARMOVE).
Fixture pose metadata
For the solver to work, each fixture must know where it hangs. Set this at patch time:
ADD FIXTURE 1 TYPE Chauvet Professional Rogue R3 Spot AT 1/1 POS 4.0 0.0 6.0 ORI 0 -30 0
Or update later:
UPDATE FIXTURE 1 POS 4.0 0.0 6.0
UPDATE FIXTURE 1 ORI 0 -30 0
ORI yaw pitch roll is in degrees, right-hand rule around each axis. yaw
rotates around Z (up), pitch around Y, roll around X; rotations are
applied roll, then pitch, then yaw.
Diagnostics
LIST TARGETS                     # list all targets with positions and calibration slot
SHOW TARGET <id|name>            # full details: position, calibration slot, usage count
INSPECT FIXTURE <id> CAP pan     # show how pan/tilt was solved for a target reference
WHERE TARGET <id|name>           # list cue parts that reference this target